Finding Lane Lines on a Highway
Finding Lane Lines on a Highway
- 5 minsFinding Lane Lines on the Road
Self-driving vehicle technology is inevitable and there are many players out there racing to get to the different levels of autonomy. To be a part of this technological disruption, there are a few fields that one can focus to excel at - computer-vision, sensor-fusion, localization, planning and controls.
Reflection
This first project of Udacity’s SDCND is to recognize lane-lines on a freeway in a video and overlay them with a continuous (red or any preferred color) line using computer vision techniques. The computer vision techniques were applied by using the Open Computer Vision (OpenCV) library. The project was written in Python.
This project gave me a good exposure to understand the basics of computer vision and more importantly apply them in a real project. I would like to explain in detail the steps I followed/took to complete this project.
The Image processing pipeline
The project has a template that leads one to achieve this goal as a step-by-step process. In this template I worked on an image processing pipeline which is:
- Import a sample image and pre-process it
- Pre-processing includes - convert to grayscale, apply gaussian smoothing
- Apply Canny transform as an edge detection technique
- Identify region of interest in the edge detected image
- Apply Probabilistic Hough Transform
- Overlay continuous lines on the original image
Why pre-processing of the Image?
It can be assumed that these images are taken from a camera that is on the dashboard of the vehicle. It is susceptible to physical perturbances and other kinds of image noise. To efficiently run the lane finding algorithm, these pre-processing techniques will aid in the fidelity of the algorithm’s output.
The sample image after applying grayscale filtering is shown below.
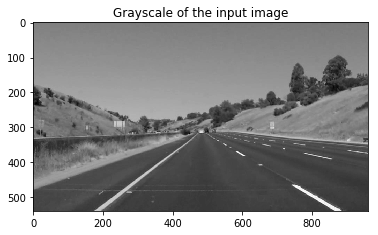
Grayscale filtering helps to enhance the gradient changes in the image and in our case the lane lines are white on the black surface.
Next, a gaussian smoothing is applied to eliminate image noise. I tried different kernel sizes and understood that the other parameters later in the pipeline also gets affected by this kernel size.
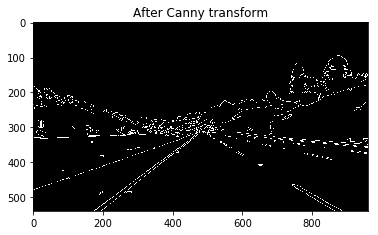
To detect edges in the image the canny transform is applied and the edges are determined between two parameters - low and high threshold values. Here is the output of the gaussian smoothened image after canny transform.
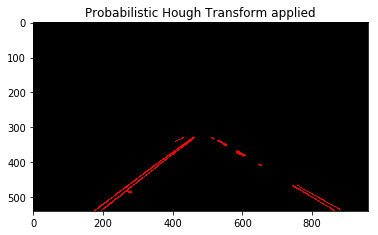
Now, the edges in the whole image is detected but we are concerned only about the lane lines. So, a region of interest mask (typically a polygon is helpful) can be applied to filter only the lane lines. The probabilistic hough transform does the job.
The draw_lines() function
The draw_lines() function originally draws lines based on the canny edge detected image. But there are a few techniques used here to actually extrapolate the lines. I modified it and named it draw_lines_extrapolated().
Decide based on Slope value
The idea is to categorize the edges obtained into two sides - right and left lines. The slope of these two lines are different and a good deciding factor. The slope is negative for the left lane line and positive for the right. The slope and the intercept for each line detected by the hough transform is calculated using the np.polyfit() function.
Calculate x1 and x2 points
The x1, x2 points for both left and right lane lines are calculated based on the simple straight line equation y = mx + c. They are stored in a list and later a mean is calculated using np.nanmean(). The y1, y2 points are nothing but the two limits of the polygon mask that we used earlier in the image processing pipeline. Finally, there are four points - (x1 , y1), (x2, y2) for each lane line and in total eight points to draw two extrapolated lines for every image.
Draw the lines
I went ahead with the cv2.line() function to draw the final extrapolated right and left line. This worked perfectly for every image that I tested. But it had some glitches when I tested it on the video.
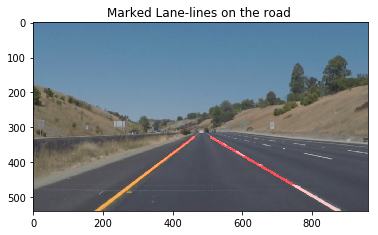
The final image that confirms the image processing pipeline.
Change parameters for the video processing
The parameters that define the probabilistic hough transform for a single image is different from that for a video.
For 1 image: houghTransform(roi_img, rho=2, theta=(np.pi/180), threshold=18, min_line_len=50, max_line_gap=4)
For the video, the above parameters did not work and the extrapolated lines that were overlaying on the video were quite shaky and not consistent. Even after taking a mean of all the x points to draw the line this issue persisted. I tried various values and then obtained the following.
For the video: houghTransform(roi_img, rho=2, theta=(np.pi/180), threshold=55, min_line_len=40, max_line_gap=100)
The threshold, min_line_len and max_line_gap parameters are now different. I obtained these values after a lot of trial and error and it resulted in a stable and consistent overlay of the extrapolated lane lines.
2. Identify potential shortcomings with your current pipeline
- White and yellow lines are detected in the first two videos but not in the challenge video which has tree shades obstructing the clarity of the lines.
- Another potential shortcoming is that the same parameters while detecting and drawing lane lines on a image vs on a video is not the same. This tuning can only be done on a trial and error basis which is certainly not the efficient way for when it has to work on a vehicle.
3. Suggest possible improvements to your pipeline
So, the current pipeline works for the white and yellow lines video but not on the challenge video. This is actually due to different lighting conditions exposed to the camera (shades) in the challenge video.
Possible improvement can be to check different color spaces like HSV (Hue, Satutation, Value) and HSL (Hue, Satutation, Lightness) and use them to filter the yellow and the white lines instead of grayscaling.